Exposure (photography): principles, components, and practical use
Exposure in photography describes how much light reaches a film or sensor to form an image, and the resulting photograph. Covers the exposure triangle, metering, history, common techniques and key terms.
Overview
In photography, exposure is the total amount of light that reaches the light-sensitive surface—whether photographic film or a digital sensor—and the resulting image produced by that process. The term can mean both the act of allowing light to reach the medium and a single photograph made with a particular combination of settings. Exposure determines whether an image appears properly bright, dark, or washed out, and it interacts with camera controls and scene lighting to shape the final picture. For a general introduction see exposure overview.
Image gallery
10 Images


Principles and components
Exposure is controlled by three primary variables often called the exposure triangle: aperture, shutter speed, and sensitivity. Aperture adjusts how large the lens opening is and affects depth of field; shutter speed controls how long the medium is exposed to light; and sensitivity (ISO on digital cameras and film speed for analog) defines how responsive the recording medium is to light. These three elements combine to produce a given exposure value and can be traded off against one another to achieve different artistic effects.
Both film and modern electronic cameras rely on the same physical input: the amount and quality of light in the scene striking the photosensitive surface. Differences in materials and design, such as emulsion characteristics for film or pixel and amplifier design for sensors, affect noise, dynamic range, and tonal response. For a closer look at media differences, see film and sensor characteristics.
History and development
Early photographic processes required very long exposures measured in minutes or longer, making portraiture and fast action difficult. Advances in lens design, chemical sensitometry and later electronic imaging gradually reduced the light required for a usable exposure. Standardized sensitivity ratings (such as ISO) and reliable shutter mechanisms allowed photographers to predictably control exposure, while modern metering and digital review further simplified the process.
Practical techniques and tools
- Metering: Cameras measure scene light to recommend settings; spot, center-weighted and matrix metering are common approaches.
- Exposure compensation: intentionally offsets camera-recommended settings to favor brighter or darker results.
- Bracketing: taking multiple shots at different exposures to ensure a usable result or to combine into high dynamic range images.
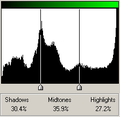
- Histograms and highlight warnings: digital aids that help evaluate exposure after capture.
Understanding exposure is essential both technically and artistically: it affects mood, clarity, and the ability to preserve highlight and shadow detail. While correct exposure is often defined as a balanced tonal rendering, creative photographers may deliberately overexpose or underexpose to achieve a desired visual effect.
Key terms and distinctions
Common terms include underexposure (too little light, loss of shadow detail), overexposure (too much light, clipped highlights), reciprocity (the inverse relationship between aperture and shutter speed), and dynamic range (the span of tone a medium can record). Mastery of these concepts lets photographers respond to varied lighting conditions and choose techniques that match their intent.
Sensitivity
The light sensitivity of films and image sensors as well as the exposure index of a photographic image are nowadays often specified according to the preferred values of the technical standard ISO 5800. The series of common values is:
ISO 100 - 200 - 400 - 800 - 1600 - 3200 - 6400 - 12800 - 25600
The ascending sequence of numbers not only means that the preceding value is doubled, but a film with the next highest ISO value is also twice as light-sensitive as the preceding one, and half as light-sensitive in reverse order.
The choice of exposure index depends first of all on the subject contrast. If the difference between light (not white) and shadow (not black) in the subject is very large, i.e. if it has a large number of finely differentiated intermediate tones, a high exposure index is selected because this has a flatter gradation and is therefore able to reproduce finer details. Accordingly, if the subject contrast is low, choose a low exposure index because the gradation is steeper here and includes fewer differentiated intermediate tones.
However, with increasing light sensitivity, the visibility of its graininess increases in the case of films, and with increasing exposure index, the image noise increases in the case of digital cameras. For this reason, too high a value should not be selected for a photographic image. A low exposure index is recommended if, for example, documents are to be photographed or only a few details are to be reproduced with high contrast from a design point of view, or if the shooting light is strong. A high exposure value is useful when the shooting light is weak.
Exposure and exposure index do not depend on the sensitivity of the recording medium, but are determined solely by the amount of light recorded, which can be influenced by the illumination of the subject and the set values for aperture and exposure time.

Aperture
An aperture is an iris diaphragm in lenses, usually made up of thin individual blades, whose diameter can be increased or decreased by turning a ring on the outside of the lens or indirectly via a motor by adjusting it on the camera. Next, aperture (number) also means the ratio of aperture to focal length of an optical system. For example, a telephoto lens of 50 mm clear aperture (D) and 200 mm focal length (f) has an aperture of D : f = 50 : 200 = 1 : 4, also written f / 4. In contrast to other optical devices, the aperture itself is not specified for photographic lenses because it is of no further significance for photographic practice. Only focal length and aperture are specified, i.e.: 200 mm - f / 4, where the specified aperture (here 4) denotes the largest adjustable of the lens and thus its speed. Common aperture numbers are included in the aperture series with the following preferred values:
f / 1,4 – 2 – 2,8 – 4 – 5,6 – 8 – 11 – 16 – 22
Small f-numbers - i.e. large apertures - can only be realized with fixed focal lengths. Intermediate steps are possible, so many zoom lenses have an initial aperture of f / 3.5, which corresponds to the step between 2.8 and 4.
Since the aperture is a reciprocal value, a large, wide-open aperture means a small f-number and a small, narrowly closed aperture means a large f-number. In the order given, from stop to stop the luminous intensity of the lens, and thus the exposure acting on the recording medium, is quartered, and in the reverse order it is quadrupled. Thus, the difference in exposure that results from adjusting by one f-stop is called the f-stop value, also called the light value (LW). Thus, an aperture value corresponds to a light sensitivity level. Therefore, for example, an image exposed at ISO 400 and f/16 can also be taken at ISO 200 and f/11 with the same exposure time and the same exposure result.
However, the aperture is not only used to control the exposure, but also determines the depth of field in the image. If you want the object to be photographed to stand out from the blurred background, choose a large aperture. If, on the other hand, you want the foreground and background to be equally sharp, use a small aperture.
However, a lens cannot be stopped down at will, because its optical resolving power is proportional to its aperture ratio (D : f). The larger the aperture and the smaller the focal length, the greater the resolving power. Therefore, as the aperture is closed, the resolving power of the lens is reduced while the focal length remains the same. The same applies to the resolving power of a film or sensor, which corresponds to its graininess or the number of its pixels. The finer the grain, the higher the resolution. If we now compare the resolving power of the lens and the recording medium, we usually reach the range at f/16 where the resolving power of the lens undercuts the resolving power of the recording material. General image blur is the result.

Measurement
Exposure meters are used to determine the correct aperture and time.
All photographic recording media and measuring instruments are calibrated to a so-called medium gray, which is possible because all colors can be reduced to the various shades of gray in terms of brightness distribution. This is based on the average light reflection indoors, which corresponds to the reflection of 18% of the incident light. The difference between this gray and ninety percent white, which just reproduces a little drawing, is two f-stops.
In light meters, there are two ways to measure light, light metering and object metering.
On the one hand, the light measurement can be performed at the subject. In this case, you have to walk towards the subject, which is not always possible. This type of measurement only occurs with hand-held exposure meters, where the light incident on the subject is measured and the exposure meter is held with the calotte advanced from the subject towards the camera.
In the opposite direction, when measuring from the camera towards the subject, it is object measurement. Here, the light reflected from the subject is measured. This type of light metering is found in all exposure meters built into the camera, but it is also possible to use hand-held exposure meters, in which case the calotte must be pushed to the side.
Object metering is less reliable because it measures not the uniformly incident light but the reflected light, which can be reproduced quite differently by the individual parts of the subject. The exposure meters try to compensate for this by taking the average gray as a basis. If, however, a subject is not average, but predominantly bright or predominantly dark, the light meters, due to their calibration, assume the predominant as the average gray and thus shift the gray gradation of the subject in one direction or the other, so that bright subjects are underexposed and dark subjects are overexposed. In snow, beach, white house front, deep forest and similar situations, there is therefore a risk of incorrect exposure.
Under-exposed images look too dark and no more drawing appears in the shadows, they run over. Overexposed images are too bright and no drawing appears in the highlights. They look frayed and the colors washed out.
Possible errors in exposure metering can be avoided in various ways. One simple way is to make an exposure bracket with at least three exposures that differ by half or a third of an aperture value. It is also simple to meter a bright or dark subject not directly, but to the side of the actual subject, where medium gray is found, and to pan the camera to the subject with these values. Reliable and easy is to combine the two aforementioned methods. Reliable, but cumbersome is the measurement via a gray card.
· Exposure series with histograms
· 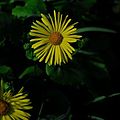
Exposure bracket: underexposure
· 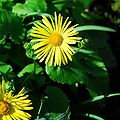
Exposure bracket: Correct exposure
· 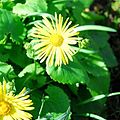
Exposure bracket: overexposure
· 
Histogram of underexposure
· 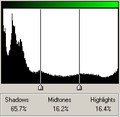
Histogram of the correct exposure
· 
Overexposure histogram


Calibration of the measurement
The relationship between light value  , the f-number
  and the exposure time
  is as follows for the reference value for the exposure index of

During a reflection measurement (object measurement), a light meter calculates the light value relevant for the camera setting from the measured luminance  an object using the following formula:

Here, K is the calibration factor of the exposure meter. According to ANSI/ISO 2720-1974, K is selected between 10.6 and 13.4. Normally K = 12.5 for Nikon, Canon, Sekonic and K=14 for Minolta and Pentax.
When measuring incident light (light measurement), the light value is derived from the measured illuminance  (unit of measurement lux) according to the following formula:

With a cylindrical (flat) attachment in front of the light meter sensor, ANSI/ISO 2720-1974 recommended values are 240 to 400 (typically 250). With a hemispherical attachment, the recommended values for C are 320 to 540, with values at 340 being most common.
In practice, it is advisable to match the exposure index of a digital camera with the external exposure meter via a reference measurement (gray card) when taking light measurements, as the ISO values specified by different manufacturers for digital sensors can differ considerably.
Digital optical devices
In the case of digital optical devices, exposure metering can also be performed by the image sensor itself with which the image is to be captured. In live view mode, the user can then even be shown on a screen or in an electronic viewfinder before the image is taken if there is an overexposure by marking the overexposed pixels with a conspicuous color or zebra pattern:
· Overexposure
· 
Photographic image with overexposed partial areas in cloudy sky, snow cover is darker than white level
· 
Highlighting the overexposed pixels with a zebra pattern
· 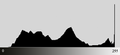
Histogram with the corresponding distribution of the frequencies of brightness values - due to overexposure, the white point is very frequently represented at the right edge of the histogram
Exposure without measurement
Makeshift exposure can also be made without metering based on experience, as was the case with the old cameras before the advent of light meters. In the period from two hours after sunrise to two hours before sunset, ISO 100 and an exposure time of 1/250 seconds apply:
| Light | Aperture |
| Beach, snow in bright sun | 16 |
| Bright sunlight | 11 |
| hazy sunlight | 8 |
| Cloudy, bright | 5,6 |
| cloudy, open shadows | 4 |
In the summer months, the aperture must be reduced by half an aperture value in addition to the aforementioned values, and the aperture must be increased accordingly in the winter months. In extreme lighting conditions, a correction of one f-stop may also be necessary.
See also
- Zone system
- Short time photography, long time exposure, available light
- Enlarger
- High Dynamic Range Image (HDR Image)
Related articles
Author
AlegsaOnline.com Exposure (photography): principles, components, and practical use Leandro Alegsa
URL: https://en.alegsaonline.com/art/32999